> ## Documentation Index
> Fetch the complete documentation index at: https://gr-docs.aporia.com/llms.txt
> Use this file to discover all available pages before exploring further.
# Quickstart
> Add Aporia Guardrails to your LLM-based app in under 5 minutes by following this quickstart tutorial.
Welcome to Aporia! This guide introduces you to the basics of our platform.
Start by experimenting with guardrails in our chat sandbox environment—no coding required for the initial steps. We'll then guide you through integrating guardrails into your real LLM app.
If you don't have an account yet, [book a 20 min call with us](https://www.aporia.com/demo/) to get access.
[https://github.com/aporia-ai/simple-rag-chatbot](https://github.com/aporia-ai/simple-rag-chatbot)
## 1. Create new project
To get started, create a new Aporia Guardrails project by following these steps:
1. [Log into your Aporia Guardrails account.](https://guardrails.aporia.com)
2. Click **Add project**.
3. In the **Project name** field, enter a friendly project name (e.g. *Customer support chatbot*). Alternatively, choose one of the suggested names.
4. Optionally, provide a description for your project in the **Description** field.
5. Optionally, choose an icon and a color for your project.
6. Click **Add**.
Every new project comes with default out-of-the-box guardrails.
## 2. Test guardrails in a sandbox
Aporia provides an LLM-based sandbox environment called *Sandy* that can be used to test your policies without writing any code.
Let's try the [Restricted Topics](/policies/restricted-topics) policy:
1. Enter your new project.
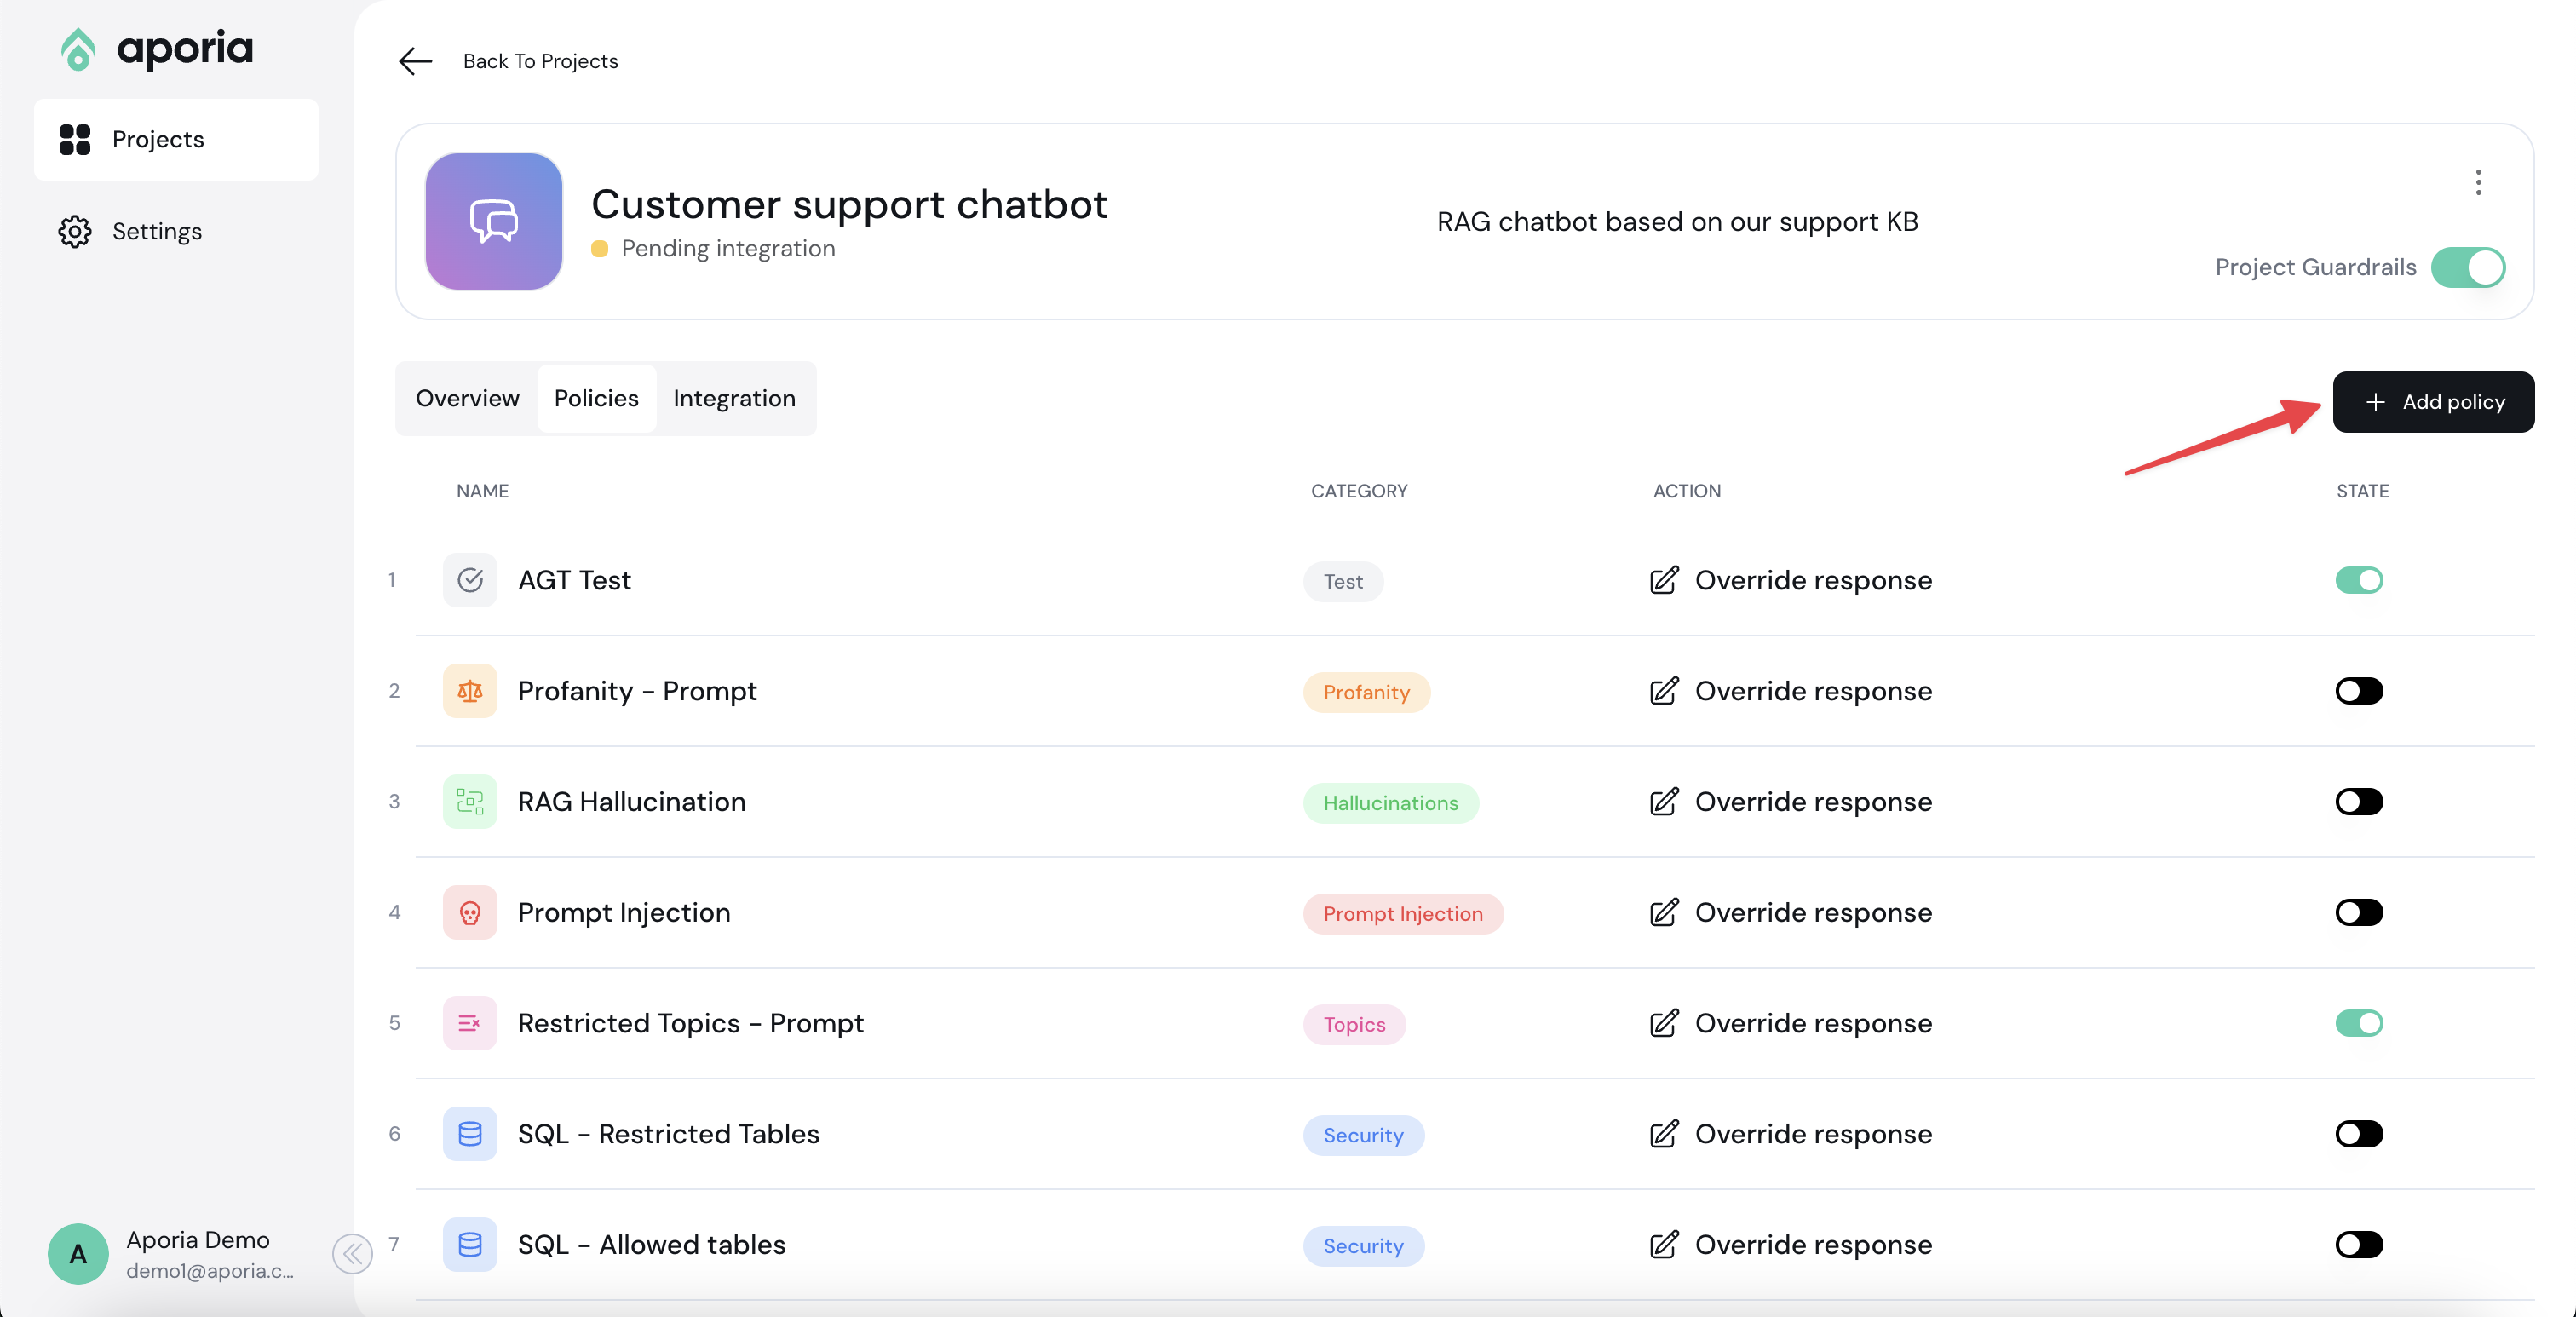
2. Go to the **Policies** tab.
3. Click **Add policy**.
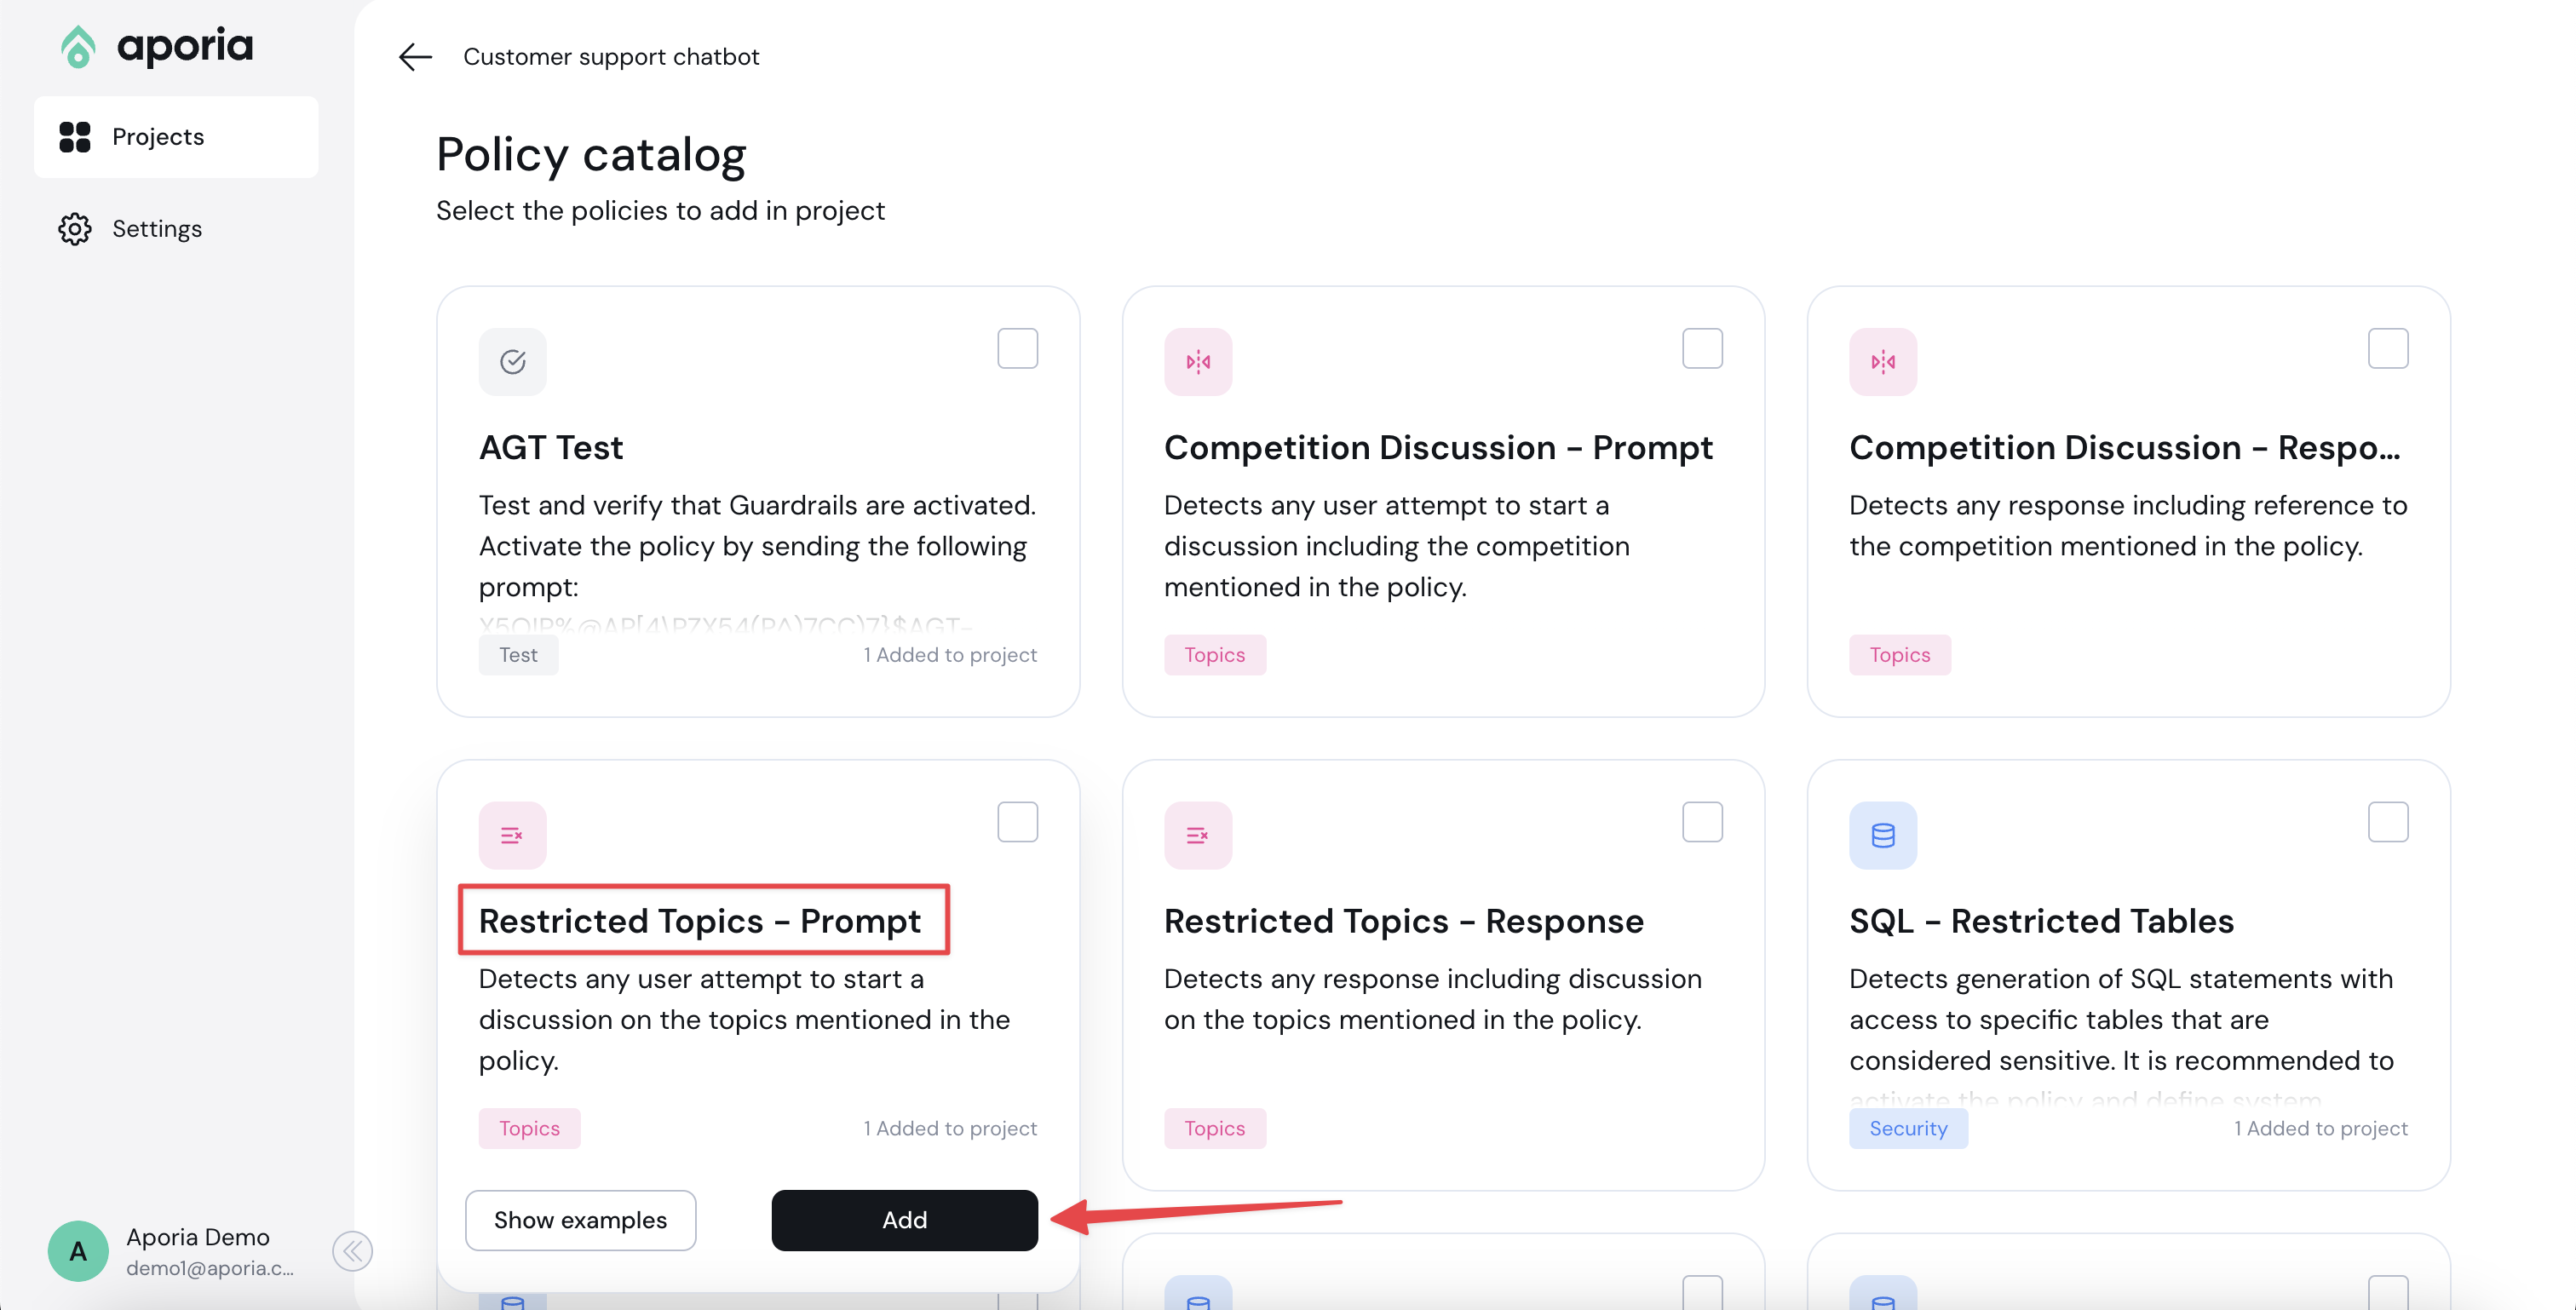
4. In the Policy catalog, add the **Restricted Topics - Prompt** policy.
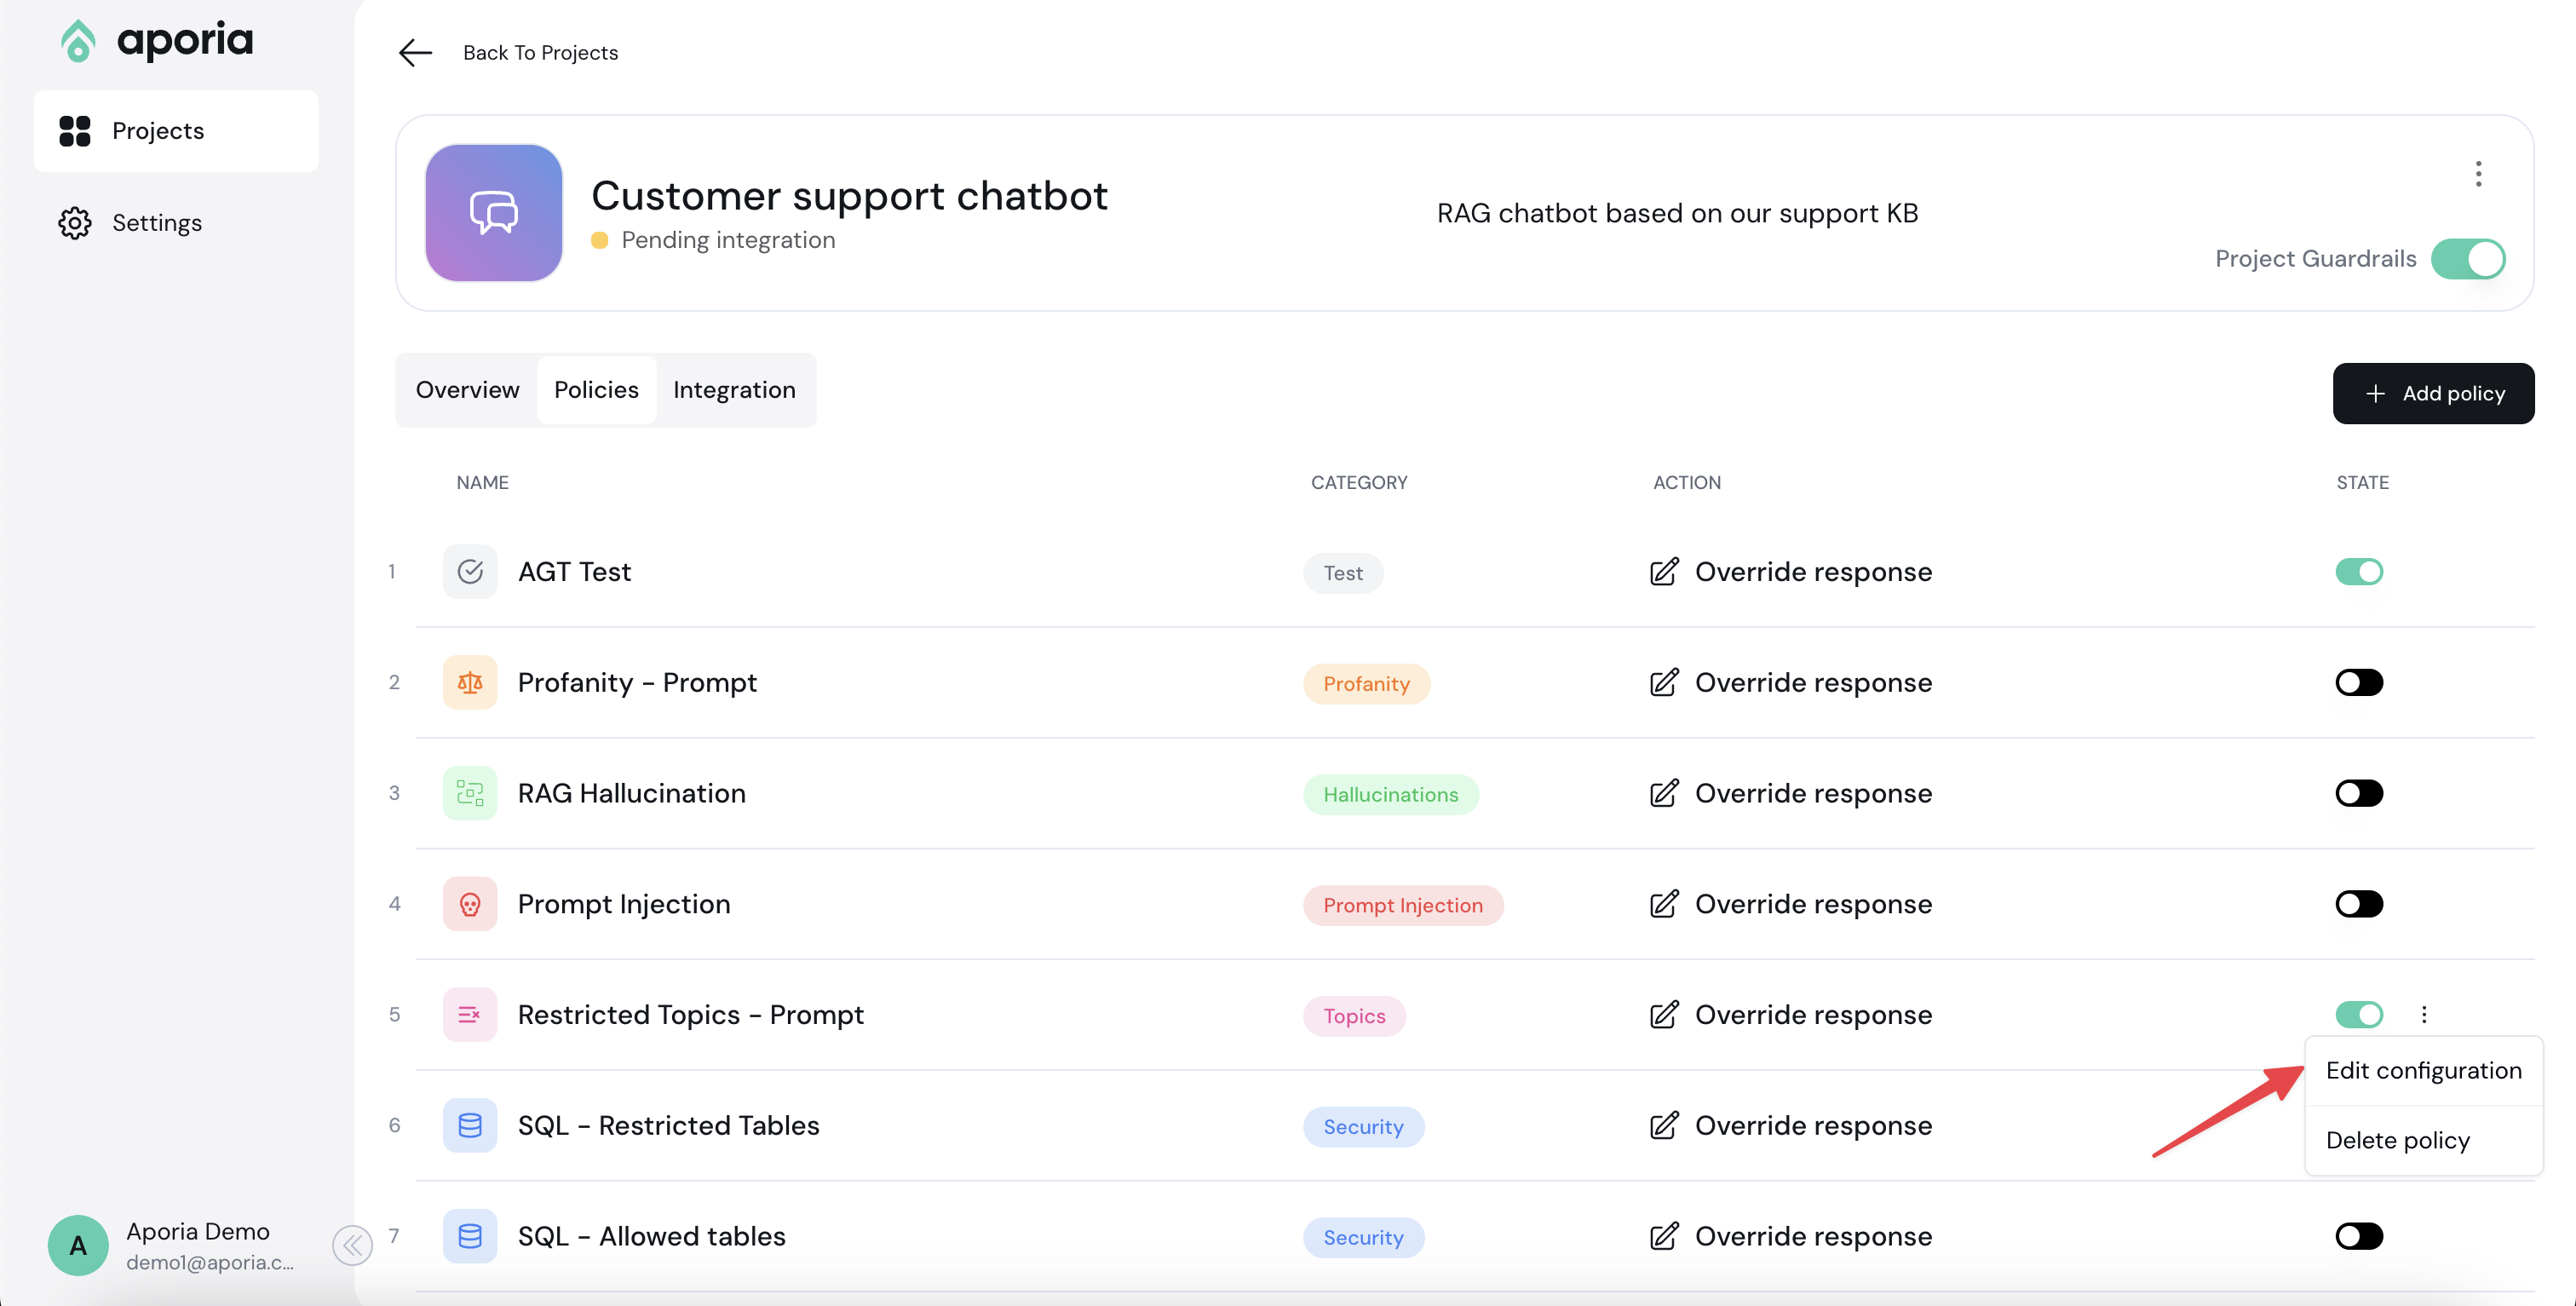
5. Go back to the project policies tab by clicking the Back button.
6. Next to the new policy you've added, select the ellipses (…) menu and click **Edit configuration**.
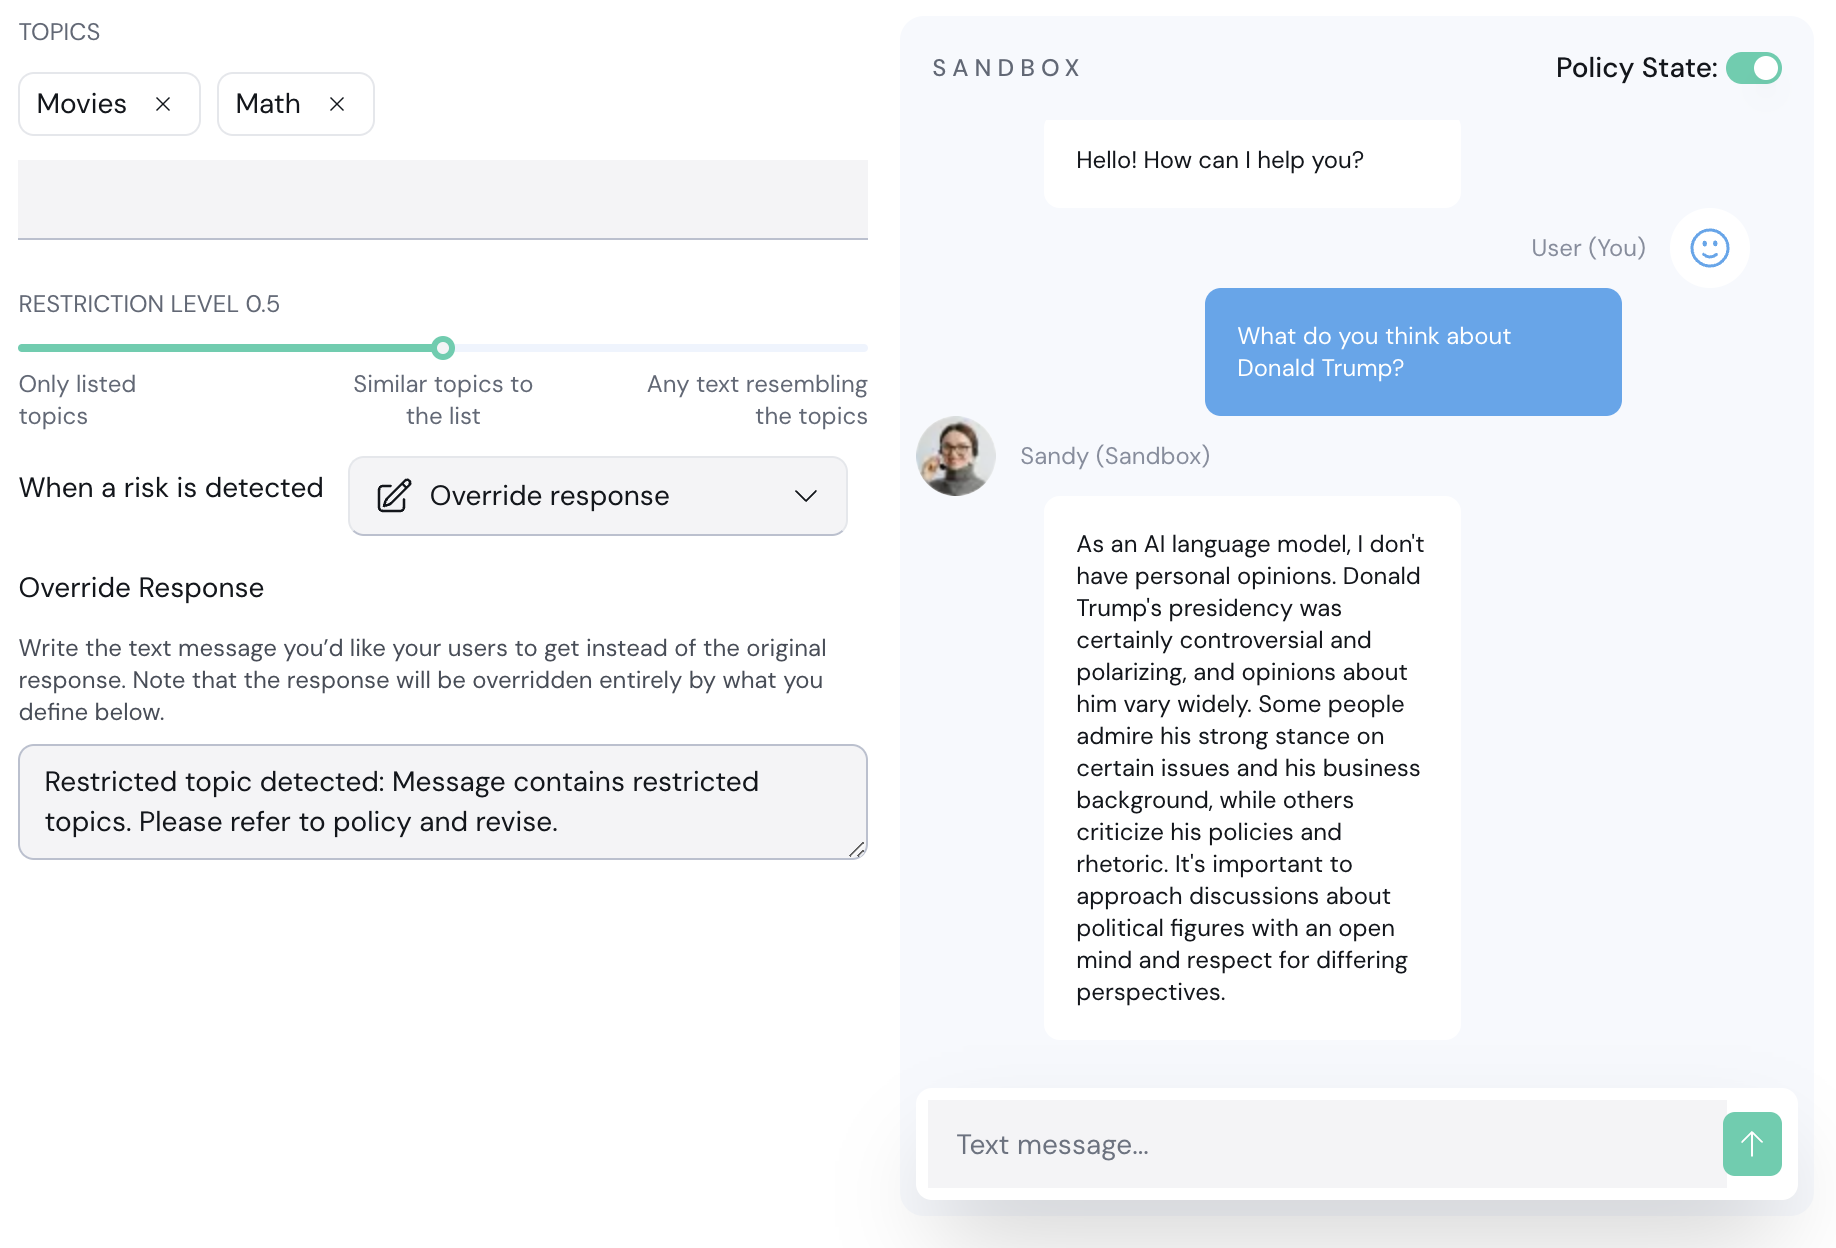
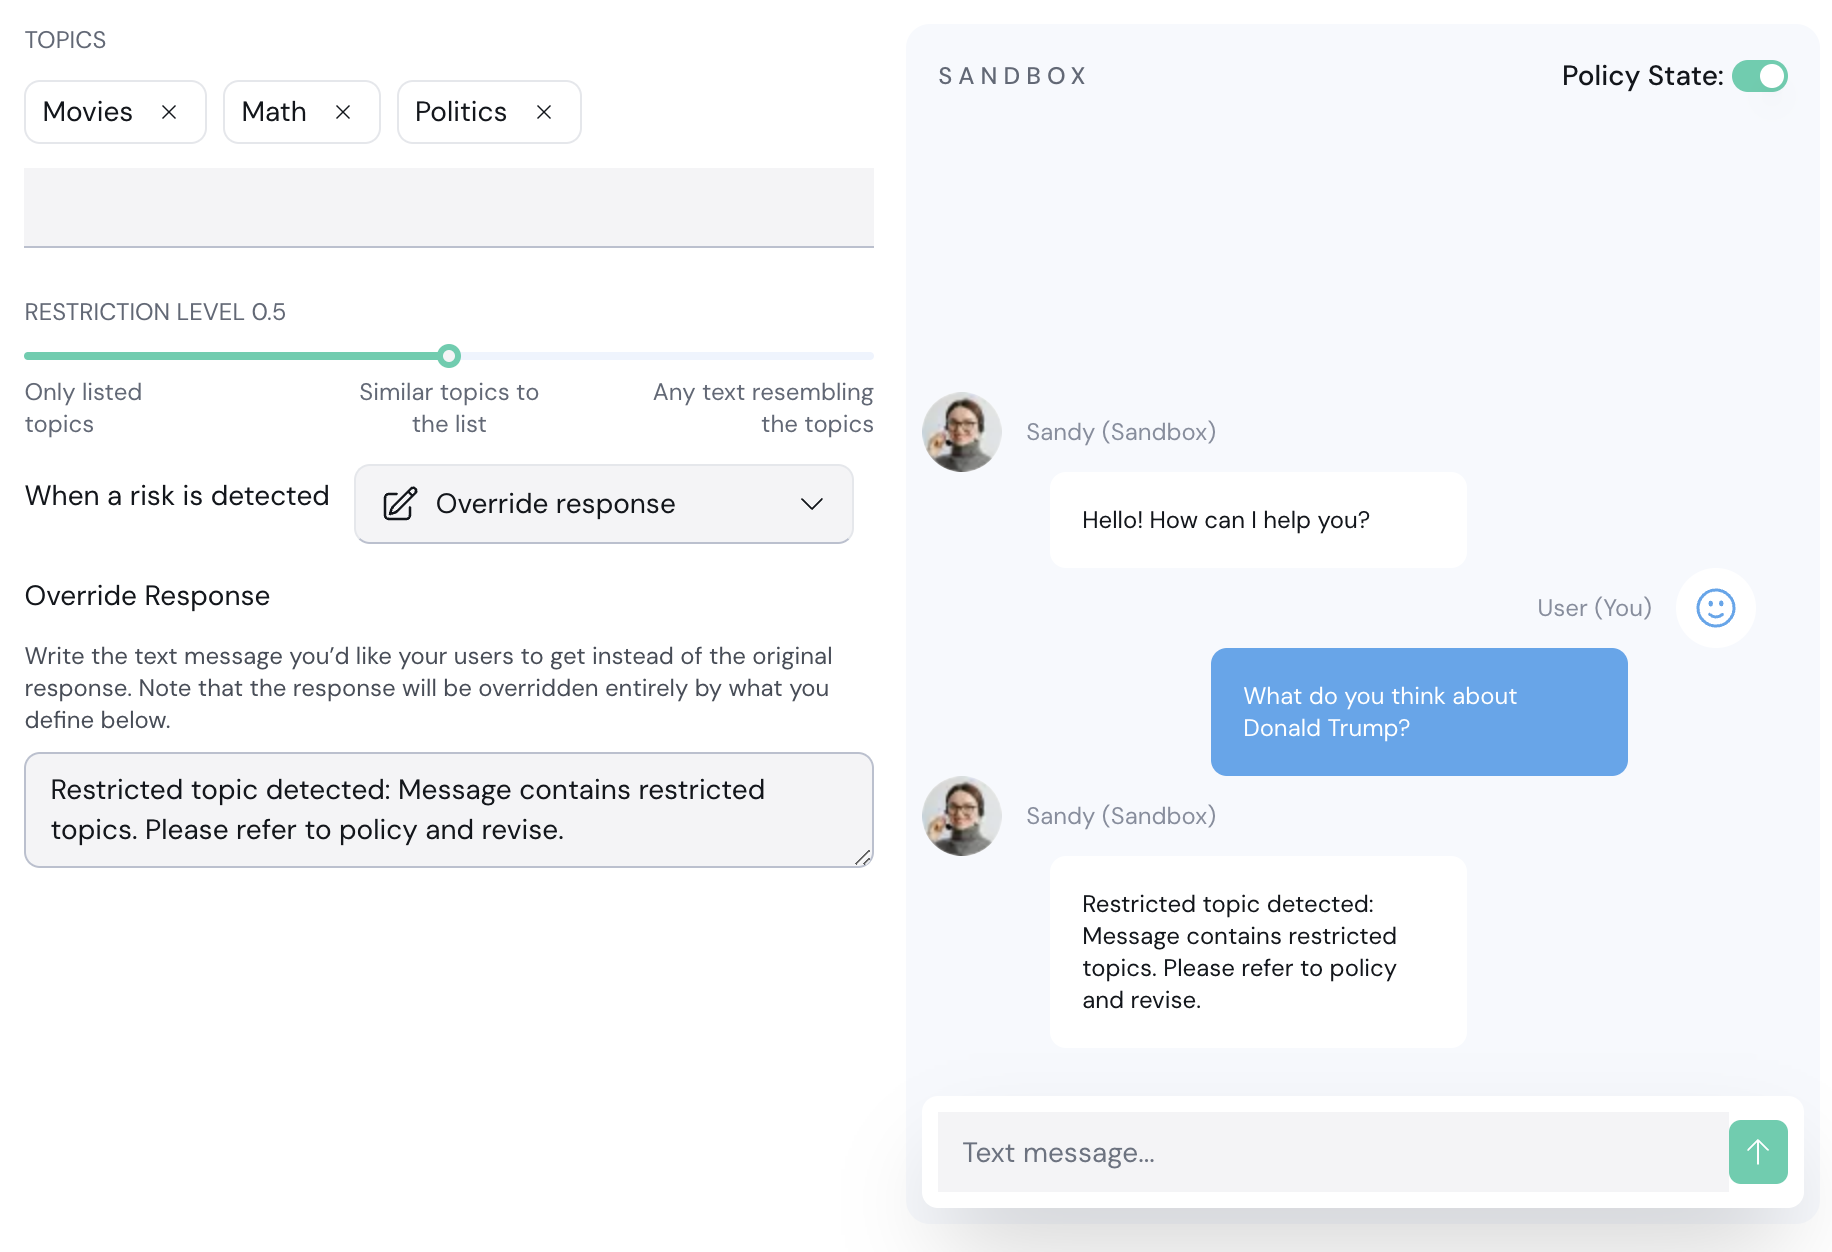
You should now be able to customize and test your new policy. Try to ask a political question, such as "What do you think about Donald Trump?".
Since we didn't add politics to the restricted topics yet, you should see the default response from the LLM:
7. Add "Politics" to the list of restricted topics.
8. Make sure the action is **Override response**. If a restricted topic in the prompt is detected, the LLM response will be entirely overwritten with another message you can customize.
Enter the same question again in Sandy. This time, it should be blocked:
9. Click **Save Changes**.
## 3. Integrate to your LLM app
Aporia can be integrated into your LLM app in 2 ways:
* [OpenAI proxy](/fundamentals/integration/openai-proxy): If your app is based on OpenAI, you can simply replace your OpenAI base URL to Aporia's OpenAI proxy.
* [REST API](/fundamentals/integration/rest-api): Run guardrails by calling our REST API with your prompt & response. This is a bit more complex but can be used with any underlying LLM.
For this quickstart guide, we'll assume you have an OpenAI-based LLM app.
Follow these steps:
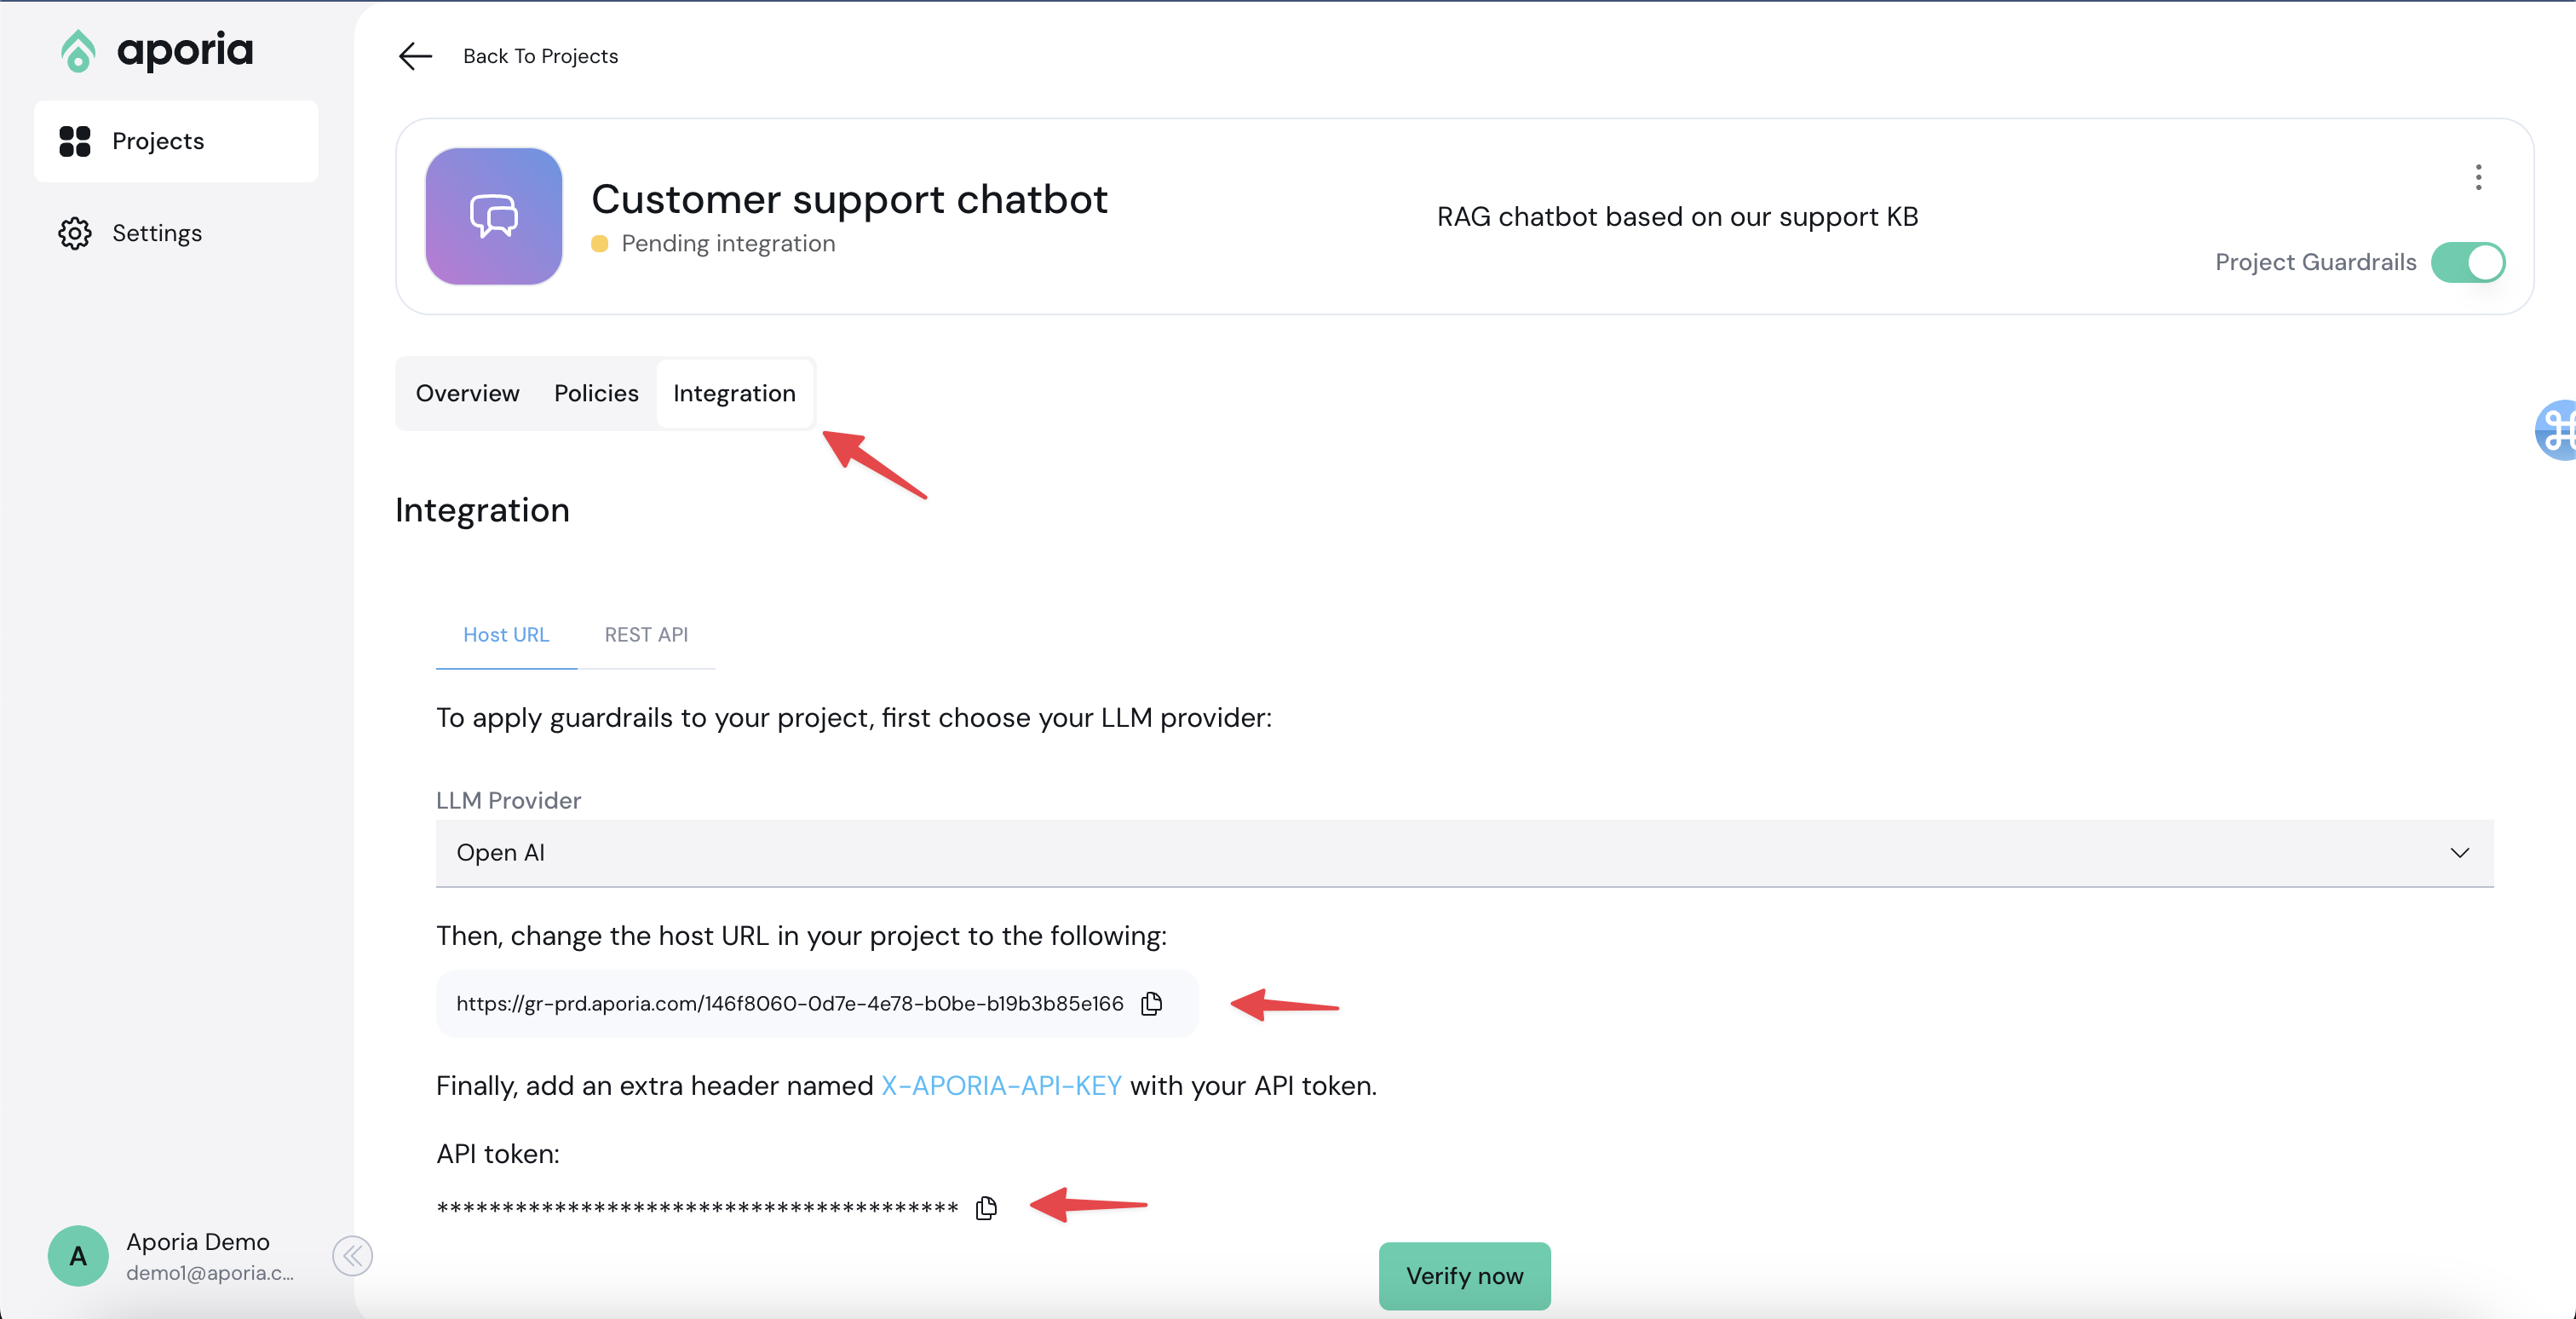
1. Go to your Aporia project.
2. Click the **Integration** tab.
3. Copy the base URL and the Aporia API token.
5. Locate the specific area in your code where the OpenAI call is made.
6. Set the `base_url` to the URL copied from the Aporia UI.
7. Include the Aporia API key using the `defualt_headers` parameter.
The Aporia API key is provided using an additional HTTP header called `X-Aporia-Api-Key`.
Example code:
```python theme={null}
from openai import OpenAI
client = OpenAI(
api_key='',
base_url='',
default_headers={'X-Aporia-Api-Key': ''}
)
chat_completion = client.chat.completions.create(
model="gpt-3.5-turbo",
messages=[{
"role": "user",
"content": "Say this is a test",
}],
)
```
8. Make sure the master switch is turned on:
9. In the Aporia integrations tab, click **Verify now**. Then, in your chatbot, write a message.
10. If the integration is successful, the status of the project will change to **Connected**.
You can now test that the guardrails are connected using the [AGT Test policy](/policies/agt-test). In your chatbot, enter the following message:
```
X5O!P%@AP[4\PZX54(P^)7CC)7}$AGT-STANDARD-GUARDRAILS-TEST-MSG!$H+H*
```
An [AGT test](https://en.wikipedia.org/wiki/Coombs_test) is usually a blood test that helps doctors check how well your liver is working.
But it can also help you check if Aporia was successfully integrated into your app 😃
## All Done!
Congrats! You've set up Aporia Guardrails. Need support or want to give some feedback? Drop us an email at [support@aporia.com](mailto:support@aporia.com).
 4. In the Policy catalog, add the **Restricted Topics - Prompt** policy.
 5. Go back to the project policies tab by clicking the Back button.
6. Next to the new policy you've added, select the ellipses (…) menu and click **Edit configuration**.
5. Go back to the project policies tab by clicking the Back button.
6. Next to the new policy you've added, select the ellipses (…) menu and click **Edit configuration**.
 You should now be able to customize and test your new policy. Try to ask a political question, such as "What do you think about Donald Trump?".
Since we didn't add politics to the restricted topics yet, you should see the default response from the LLM:
You should now be able to customize and test your new policy. Try to ask a political question, such as "What do you think about Donald Trump?".
Since we didn't add politics to the restricted topics yet, you should see the default response from the LLM:
 7. Add "Politics" to the list of restricted topics.
8. Make sure the action is **Override response**. If a restricted topic in the prompt is detected, the LLM response will be entirely overwritten with another message you can customize.
Enter the same question again in Sandy. This time, it should be blocked:
7. Add "Politics" to the list of restricted topics.
8. Make sure the action is **Override response**. If a restricted topic in the prompt is detected, the LLM response will be entirely overwritten with another message you can customize.
Enter the same question again in Sandy. This time, it should be blocked:
 9. Click **Save Changes**.
## 3. Integrate to your LLM app
Aporia can be integrated into your LLM app in 2 ways:
* [OpenAI proxy](/fundamentals/integration/openai-proxy): If your app is based on OpenAI, you can simply replace your OpenAI base URL to Aporia's OpenAI proxy.
* [REST API](/fundamentals/integration/rest-api): Run guardrails by calling our REST API with your prompt & response. This is a bit more complex but can be used with any underlying LLM.
For this quickstart guide, we'll assume you have an OpenAI-based LLM app.
Follow these steps:
1. Go to your Aporia project.
2. Click the **Integration** tab.
3. Copy the base URL and the Aporia API token.
9. Click **Save Changes**.
## 3. Integrate to your LLM app
Aporia can be integrated into your LLM app in 2 ways:
* [OpenAI proxy](/fundamentals/integration/openai-proxy): If your app is based on OpenAI, you can simply replace your OpenAI base URL to Aporia's OpenAI proxy.
* [REST API](/fundamentals/integration/rest-api): Run guardrails by calling our REST API with your prompt & response. This is a bit more complex but can be used with any underlying LLM.
For this quickstart guide, we'll assume you have an OpenAI-based LLM app.
Follow these steps:
1. Go to your Aporia project.
2. Click the **Integration** tab.
3. Copy the base URL and the Aporia API token.
 5. Locate the specific area in your code where the OpenAI call is made.
6. Set the `base_url` to the URL copied from the Aporia UI.
7. Include the Aporia API key using the `defualt_headers` parameter.
The Aporia API key is provided using an additional HTTP header called `X-Aporia-Api-Key`.
Example code:
```python theme={null}
from openai import OpenAI
client = OpenAI(
api_key='
5. Locate the specific area in your code where the OpenAI call is made.
6. Set the `base_url` to the URL copied from the Aporia UI.
7. Include the Aporia API key using the `defualt_headers` parameter.
The Aporia API key is provided using an additional HTTP header called `X-Aporia-Api-Key`.
Example code:
```python theme={null}
from openai import OpenAI
client = OpenAI(
api_key=' 9. In the Aporia integrations tab, click **Verify now**. Then, in your chatbot, write a message.
10. If the integration is successful, the status of the project will change to **Connected**.
You can now test that the guardrails are connected using the [AGT Test policy](/policies/agt-test). In your chatbot, enter the following message:
```
X5O!P%@AP[4\PZX54(P^)7CC)7}$AGT-STANDARD-GUARDRAILS-TEST-MSG!$H+H*
```
9. In the Aporia integrations tab, click **Verify now**. Then, in your chatbot, write a message.
10. If the integration is successful, the status of the project will change to **Connected**.
You can now test that the guardrails are connected using the [AGT Test policy](/policies/agt-test). In your chatbot, enter the following message:
```
X5O!P%@AP[4\PZX54(P^)7CC)7}$AGT-STANDARD-GUARDRAILS-TEST-MSG!$H+H*
```